
Best QR Code Size for Printing
Almost every printed QR code that fails does so for one of three reasons: it is too small for the distance, it has no quiet zone, or it went to the printer as a low-resolution bitmap. All three are decided before anything is on paper.
The rule
Divide the reading distance by ten. That is the width of the code.
code width = reading distance / 10Read from 30 cm, print at 3 cm. Read from 3 m, print at 30 cm. The ratio holds because a phone camera's angular resolution is roughly constant, so a code has to subtend the same angle regardless of how far away it is.
Two adjustments are worth making. Round up, never down, because the cost of a code that is 20% too big is nothing and the cost of one that is 20% too small is a reprint. And use the distance people will really stand at: nobody reads a poster from the far side of the room, and nobody gets closer to a menu than about 30 cm.
Sizes for common jobs
| Job | Read from | Print at | Notes |
|---|---|---|---|
| Business card | 20 cm | 20–25 mm | Keep the URL short so the grid stays coarse |
| Restaurant table card | 30 cm | 35–40 mm | Add a line of text saying what it opens |
| Menu footer | 30 cm | 25–30 mm | Bottom-right corner, away from the fold |
| Product label | 20 cm | 20–25 mm | Level H if the surface curves |
| A5 flyer | 30 cm | 30–40 mm | Not in the bleed area |
| A4 poster indoors | 1 m | 100 mm | Eye height beats centred |
| Shop window | 1.5 m | 150 mm | Watch for reflections at head height |
| Estate agent board | 3 m | 300 mm | Assume it is read from the pavement |
| Exhibition banner | 2 m | 200 mm | Below 1.6 m so phones can reach it |
| Vehicle livery | 5 m | 500 mm | Flat panel only, never a curved door |
Leave room for the margin
The four-module quiet zone around a QR code is part of the specification, not white space you can trade away. For a 29×29 code that is about 14% of extra width on each side.
In practice this means three things for a layout:
- Budget the outer size, not the symbol size. A 30 mm code needs roughly a 38 mm clear square in the grid.
- Nothing crosses into the margin. Not a rule, not a border, not the edge of a photograph, not a fold, not a die-cut.
- Do not place a code in the bleed. Trimming tolerance is typically ±1–2 mm, which is several modules on a small code, and a trimmed quiet zone is a dead code.
What to send the printer
Send vector. A QR code is a set of exact squares, and PDF, SVG or EPS keeps them exact at any size. A raster file has to guess when scaled, and guessing softens the very edges the scanner is looking at.
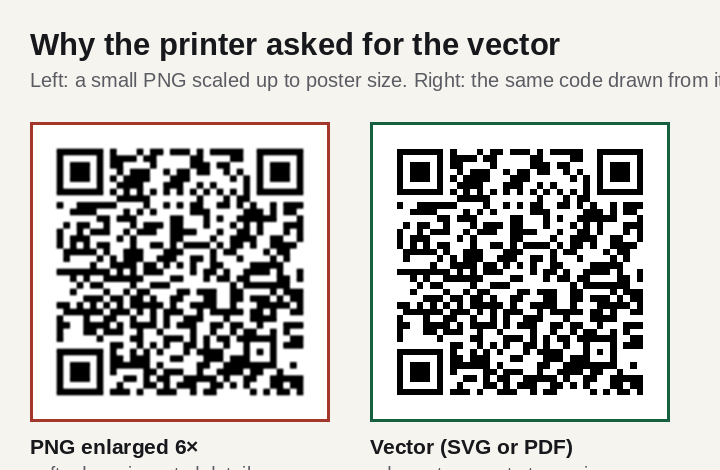
If the workflow will only take a bitmap, then size it properly rather than resizing it later:
| Final printed width | At 300 dpi | At 600 dpi |
|---|---|---|
| 20 mm | 236 px | 472 px |
| 30 mm | 354 px | 709 px |
| 40 mm | 472 px | 945 px |
| 100 mm | 1,181 px | 2,362 px |
| 300 mm | 3,543 px | 7,087 px |
One more constraint that matters more than resolution: make the module land on a whole number of printer dots. A 29-module code at 300 dpi printed 30 mm wide gives 12.2 dots per module — the fractional part shifts from module to module and the edges wobble. Nudging the size so each module gets exactly 12 dots produces a visibly crisper code. The difference shows up on thermal and low-resolution label printers most of all.
Avoid JPEG entirely. It is built to blur exactly the hard black-and-white boundaries a QR code is made of. PNG for raster, PDF or SVG for anything a print shop touches — the reasoning is in PNG versus SVG.
Six mistakes that survive to the proof
- Testing only on the designer's phone. A new flagship at 20 cm in good light will read almost anything. Test on the oldest phone in the office, at the real distance, in the real light.
- Testing on screen instead of on paper. Ink spread, paper absorption and the printer's own dithering all shave at module edges, and that scattered kind of damage is the worst kind — the measurements are in error correction explained.
- Inverting the code to suit the palette. Light modules on a dark ground read in nothing we tested. Details in how to print a QR code.
- A gradient or photograph behind it. Binarisation happens before decoding, and a varying background breaks it.
- A logo that is too big or off-centre. Under 10% of the area, dead centre, level Q or H. Anywhere near a corner and the code is finished.
- No fallback. Print the short URL underneath in small type. Some people will not scan, some scanners will not cooperate, and it costs you one line.
Before the job goes out, walk through the pre-print testing checklist. It takes ten minutes and it is the cheapest insurance in the process.
Written by Manuel Llovet, who builds and maintains QR Code Free Forever. Published 2026-08-31, last checked 2026-09-08. Figures and measurements on this page were produced for this site; the method is described in each caption.